How to add a new data source, Genomics England, to the Open Targets Platform — part 2
In the first part of this blog series, I have shown you how to modify the Open Targets Platform pipeline to incorporate a new data source.
These are the steps I have covered before:
1. Prepare your data
2. Convert your data to JSON
3. Modify your pipeline
Now on to the fun part - actually running and testing the new pipeline.
4. Run the pipeline
Start by following the instructions in data pipeline, up to the evidence validation step.
You will then run all the other evidence validations and add your own by specifying the name of the compressed JSON file with your data. The filename should match the new data source name you defined; in my case it was genomics_england_tiering.json.gz.
Once this is completed, you should have a new Elasticsearch index called 18.10_validated-data-your-source - the prefix will depend on what you specify for the pipeline run, and your-source will be what you define in Settings.py.
From release 18.12 on, there will no longer be per-source validated indices. Open Targets will replace these by two indices; all of the valid evidence will be in 18.12_evidence-data, and the invalid evidence, along with error codes, will be in 18.12_invalid-evidence-data.
I recommend using either the Elasticsearch cat API or a tool like Kibana to ensure the data in your index is sensible. Watch out if the entry count match the number of lines in your original JSON file.
Once your shiny new indices are ready, run the rest of the pipeline steps (evidence string processing, association score calculation, etc). You can now serve and query the data using the REST API and web application.
5. Configure the API and web application
There is only one change left to make: go to opentargets/rest_api and include your new data source.
Open config.py in the root directory and find the DATATYPES definition. This is a dictionary with the data type as keys, and the values are lists of sources for that data type (note that this is the other way around to the dictionary in the pipeline settings).
Add your new source to the list of sources under the appropriate key.
In my case, it was:
DATATYPES['genetic_association'] = ['uniprot',
                                    'gwas_catalog',
                                    'phewas_catalog',
                                    'eva',
                                    'uniprot_literature',
                                    'gene2phenotype',
                                    'genomics_england',
                                    'genomics_england_tiering']
I have extended the way the API is configured, so that you can now specify custom data sources via an environment variable rather than having to change code. Check the README for more details.
You can now run the REST API following the instructions in the README. Make sure that your new data source is included by querying the stats endpoint:
curl http://localhost:8080/v3/platform/public/utils/stats
You will need to change this depending on where your API is running. In the JSON that is returned, you should see your new data source, along with a count of the number of associations and evidence counts, in both the associations and evidencestrings sections:
{
    "data_version": "18.10",
    "associations": {
        "datatypes": {
            "genetic_association": {
                "total": 382629,
                "datasources": {
                    "genomics_england_tiering": {
                        "total": 33192
                    }
                    // other data sources
                }
            },
            // ...
            // other data types
            // ...
        "total": 2930398
    },
    "evidencestrings": {
        "datatypes": {
            "genetic_association": {
                "total": 225179,
                "datasources": {
                    "gwas_catalog": {
                        "total": 101542
                    },
                    "uniprot_literature": {
                        "total": 4496
                    },
                    "eva": {
                        "total": 1479
                    },
                    "gene2phenotype": {
                        "total": 1604
                    },
                    "genomics_england_tiering": {
                        "total": 26828
                    }
                    // other data sources
                }
            },
            // other data types
        "total": 6456097
    },
    "targets": {
        "total": 21153
    },
    "diseases": {
        "total": 10066
    }
}
It is also worth looking at the associations for a target and disease that you know is represented in your data, for example:
curl http://localhost:8080/v3/platform/public/association/filter?target=ENSG00000123560&disease=EFO_0009143
Your new data source should show up in the list of associations. Head to the Open Targets REST API documentation for more details.
5.1 The web application
We are almost there!
You now need to install, configure and serve the web application; opentargets/webapp repo has the instructions. This is my quick summary:
Modify the code to add your new source
In the `config` directory, you will see several subdirectories, each containing a `default.json` file. Make the appropriate modifications for your data source, such as:
datasources/default.json- add a section with the appropriate fields. Ensure that you use the data source name that corresponds to what the API returnsdatatypes/default.json- add your new data source to the relevant sectiondictionary/default.json- add your new data source name and description to the appropriate sectiongeneral/default.json- add your new data source name to the appropriate sectionsrc/pages/data-sources/templates/genomics-england-tiering.md- not strictly necessary at this point but you will need to add this if you want to have your source in the online documentation
Build the web application
You now need to re-build the web application (ensure you have set APIHOST to point to the API), following the instructions in the README.
Serve the web application
Start a web server which points at the API and take note of both the host and port it is running on.
6. Bask in the glory of your new data source
Once you run and test the web app, that will be it!
Let me recap. You should:
- Modify the pipeline configuration to include your new data source
- Run the pipeline and create the indices
- Configure and run the API; check if it is returning the expected data
- Modify and build the web app, and serve it via a web server
You can now navigate to the app in your favourite browser, and see the familiar Open Targets Platform homepage.
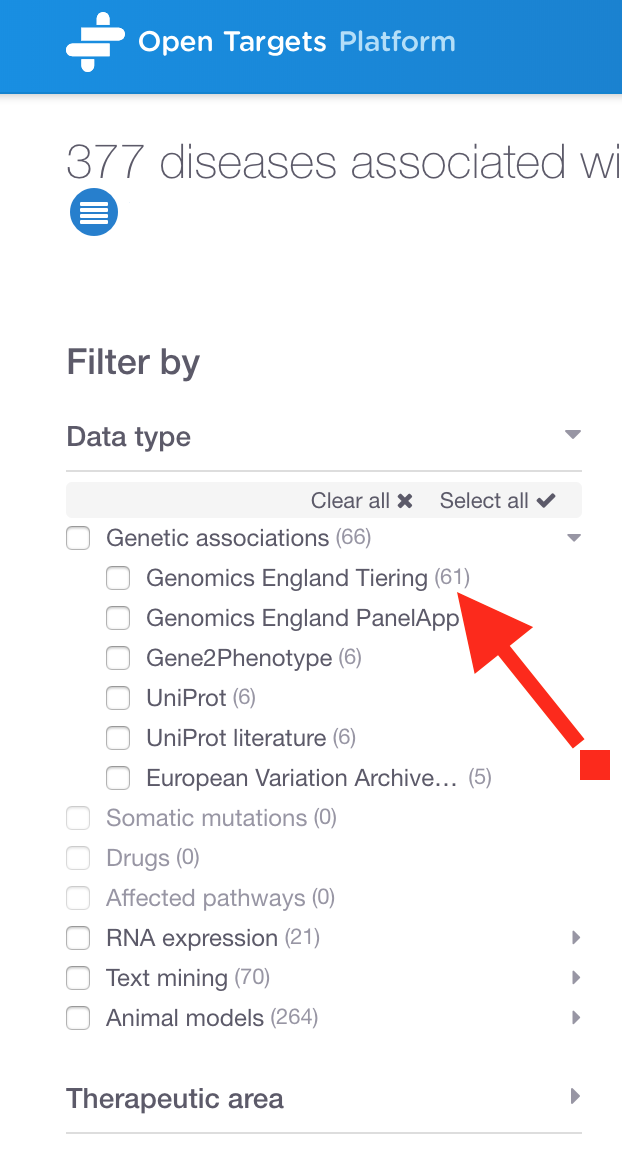
Search for a gene (or disease) that you know is represented in your newly-added data. Look at the list of filters in the data types. You should see your new data source listed under the appropriate type. I can see my new data Genomics England Tiering in the left hand panel:
Have you noticed a data source named Genomics England PanelApp? This is available in the public version of the Platform and used for many of our associations, for example as evidence for SERPING1 with 'Immunodeficiency due to an early component of complement deficiency'.
Contribute back
Open Targets is an open source project. That means that the team are happy to receive contributions to the code via pull requests.
Even though the data I added was private and hosted on a server internal to Genomics England, I was still able to contribute to Open Targets in various ways.
How? This is what I offered:
- A Makefile to make running the various stages of the pipeline easier and more consistent
- A way of logging all of the HTTP requests that the pipeline makes, so that I could ensure they were all whitelisted
- A refactored Ensembl download and processing step that now takes 20 seconds rather than 30 minutes
- Various changes to the application stack to make it easier to add a new source via run-time configuration rather than code changes
Thanks
I have really enjoyed working with the Open Targets team, and I hope this post will help you to add your own data to the great resource that the Open Targets Platform is.
Please get in touch by email - contact details are in my bio.
For any Open Targets related queries, please email their Support team
Before I go, I would also like to thank the Open Targets team for their invaluable assistance in this project, and the Genomics England team for their feedback and for giving me the opportunity to work on this exciting project in the first place.
**There is an update on this project! Read the blog post now. **